Mobile push notifications are messages that appear on your device after installing an app or a game. It’s a very convenient communication tool which is, however, still underrated because some companies fail to use it.
If you want to put push notifications to good use so that you acquire new users and make a profit rather than lose users, you need to use them effectively. Efficiency here means not only and not so much the content of messages, but frequency and relevance, because if these two factors are used incorrectly, your push notifications will cause strong irritation and dissatisfaction.
devtodev, a full-cycle analytics solution for app and game developers, allows you to quickly create a wide range of push notifications for a variety of needs - for one-time communication, for constant information, for reminders, for motivation after completing a certain action, etc. Below we will look at all these options in more detail.
How it works beneath the surface
Let's look at the first steps you need to take if you want to implement a push service in your app or game.
1. Bind your application to the service
The first thing the application developer needs to do if they want to send notifications is to integrate the Messaging Module, and get permission from the iOS services - Apple Push Notifications Service (APNS), Android - Firebase Cloud Messaging (FCM), Windows - WNS. Then, allow your application to use the push service of the corresponding platform.
Then you need to acquire a certificate of this service and install it in the project settings in the devtodev system. After that, you should integrate our SDK to collect DTDAnalytics and send DTDMessaging push notifications, and initialize them. For more information about the setup, see the documentation.
2. Application installation
The user installs the application from a store, launches it on their device. When initializing the Messaging Module, it asks permission from the user to use push notifications, and also acquires a device token (a unique device identifier) from the system. Then the module sends the device token to our server. The server Inserts the identifier in the database, matching it with the user card.
3. A push notification sending
After a push notification campaign is created, the system selects users who match the specified conditions and sends information containing a push token and the specific notification content: text, button, etc. to FCM/APNS/WNS. After that, the service sends the notification to the user's device.
Thus, devtodev acts as an intermediary between the notification services and the client, offering:
- user-friendly interface for creating notifications
- precise audience targeting
Let’s create a push notification
Push notifications differ both in genre (informational, entertaining, involving, etc.) and in type. Using the devtodev analytics platform demo project as an example, let's look at how to create three types of push notifications:
-
Regular (standard)
-
Trigger
-
Recurring (which are sent according to a schedule)
Here we will skip the first invisible stages of creating a push notification described in the previous chapter, as well as segmentation and personalization issues, and proceed to the creation of a message that the user will see on the screens of their mobile devices.
Regular one-time push notifications
How do I create a regular push notification wtih devtodev? It's easy:
-
Click ‘Push Notifications’ in the main menu.
-
Click ‘Add New Campaign’ in the top right corner.
-
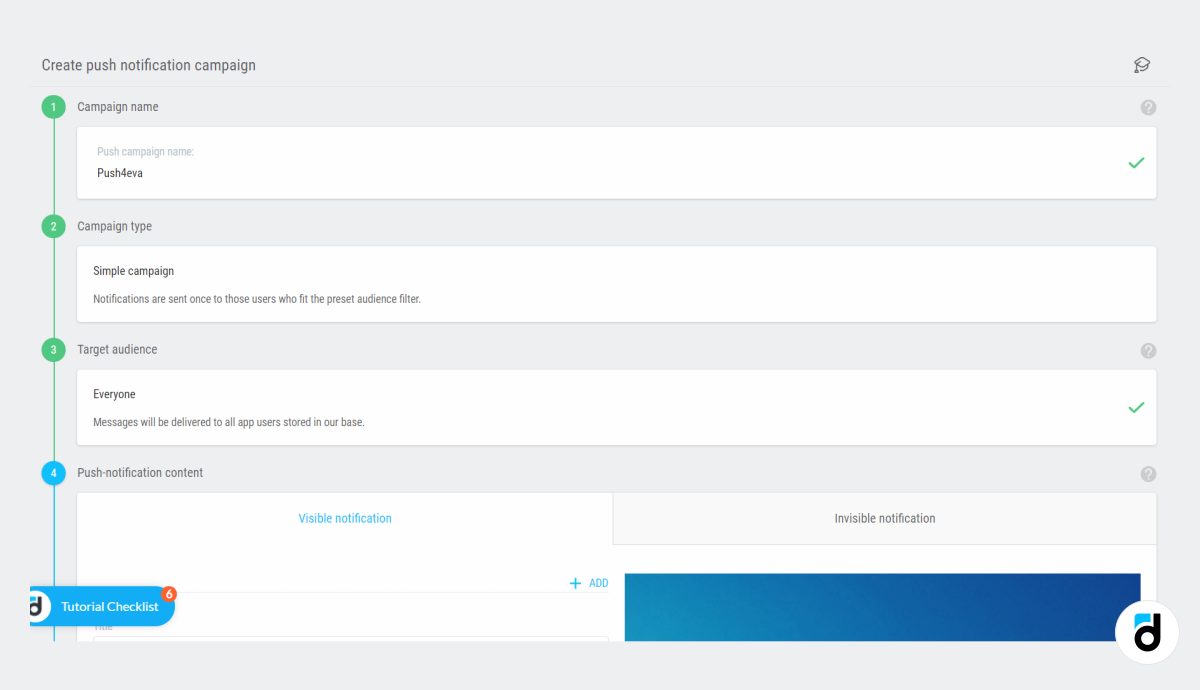
Fill in the fields - campaign name, type (Simple Campaign), select the audience:
-
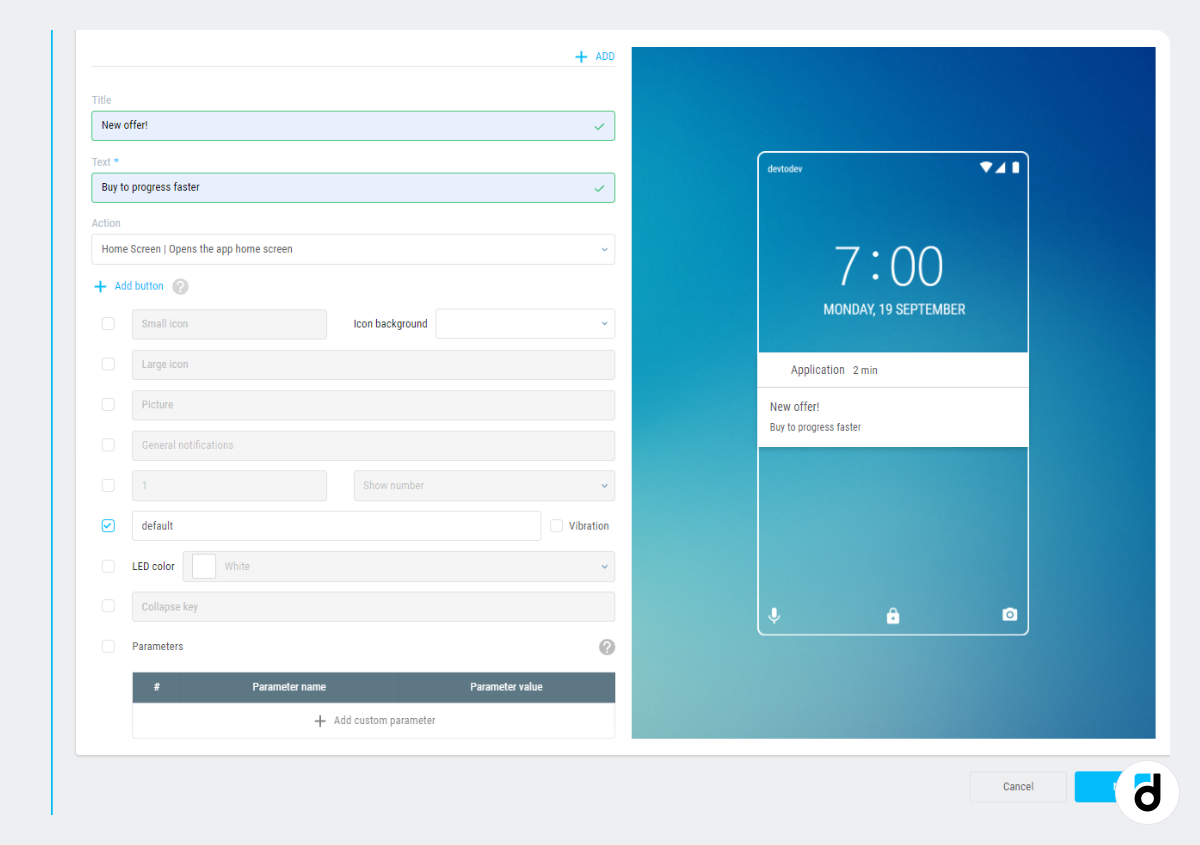
Next, you design the notification - fill in the title, text, choose colors, buttons, icons, etc.
-
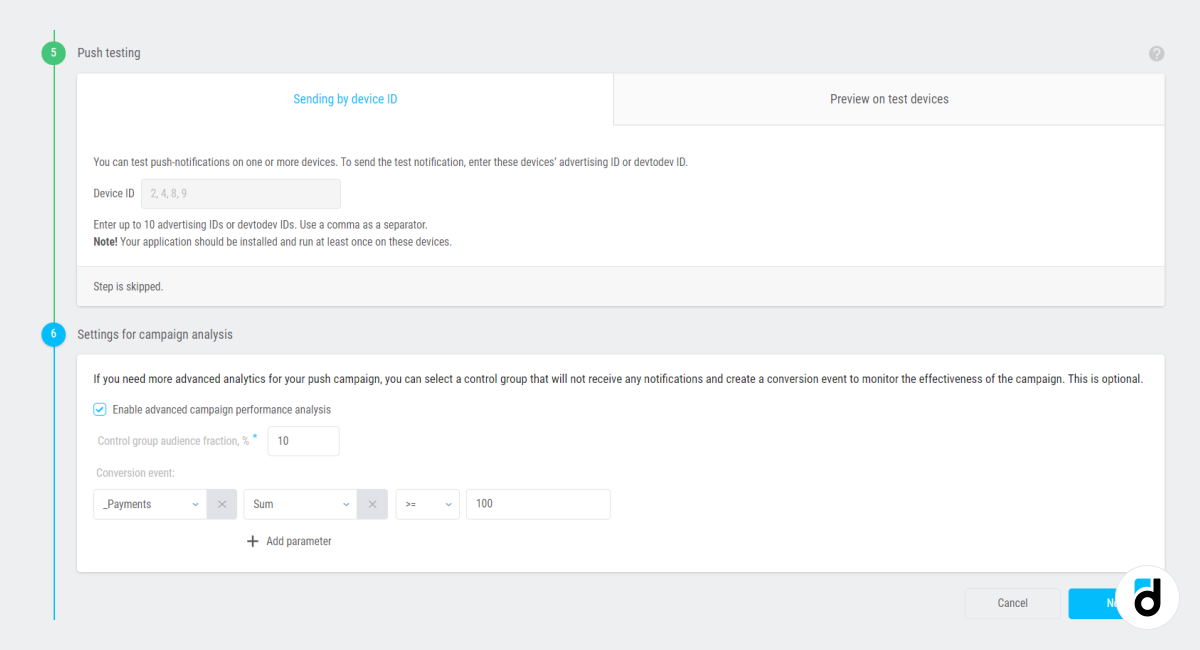
If you want to evaluate the effectiveness of the notification, you can set a control group and a key action that you want the user to perform after receiving the push notification:
- At the end, if necessary, you can set a schedule for sending your notifications (read about this below in the “Recurring push notifications" section.
And that's it!
Trigger push notifications
There are three types of triggers, that is, three conditions on the devtodev platform:
-
First open
Here you can choose the conditions that must be met for your notification to be sent to users. For example, you can send it to all users from a certain country who have opened the app for the first time. Or/and those who speak a certain language, use a certain version of the system, device, or application.
- Inactivity
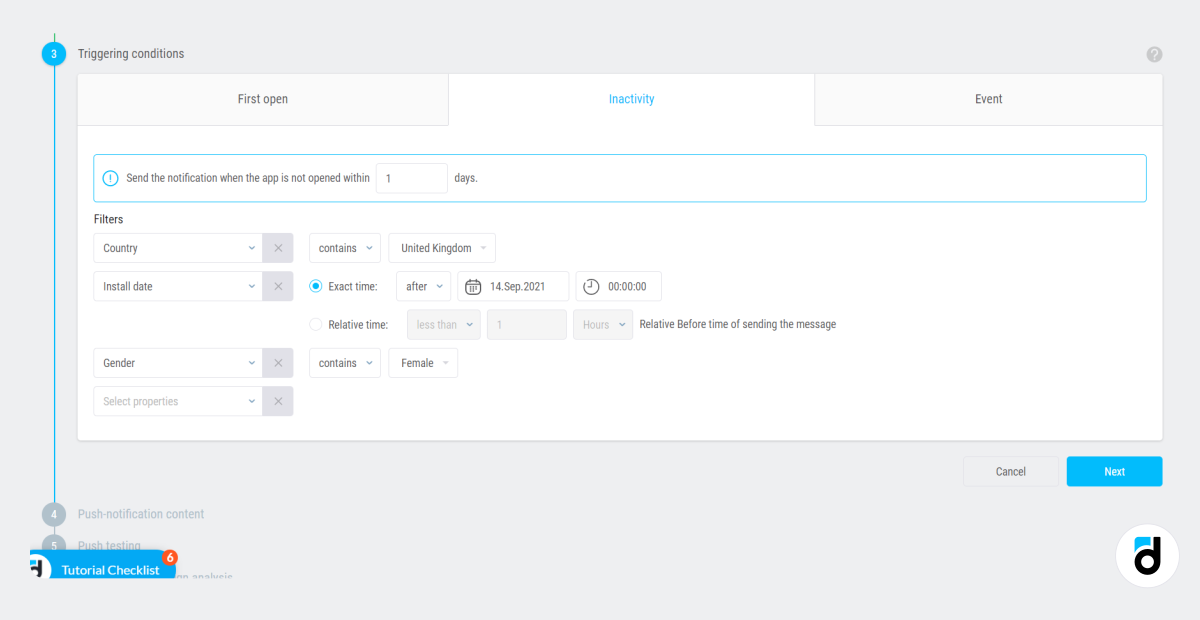
There are even more filters here. The main one is the inactivity time. You can send notifications to all the users who haven’t opened your game/application for one day, two days, a week, a maximum of 90 days. For example, you can send a notification with the following text; “It’s been two weeks since your last purchase in *app name*. Feel free to go through our menu - there are new items in it!”
Then you can specify the group of inactive users that you will target. For example, UK women who installed the app after September 14.
Or inactive people over the age of 14 acquired from organic search who made at least one payment (only if you provide devtodev with age information).
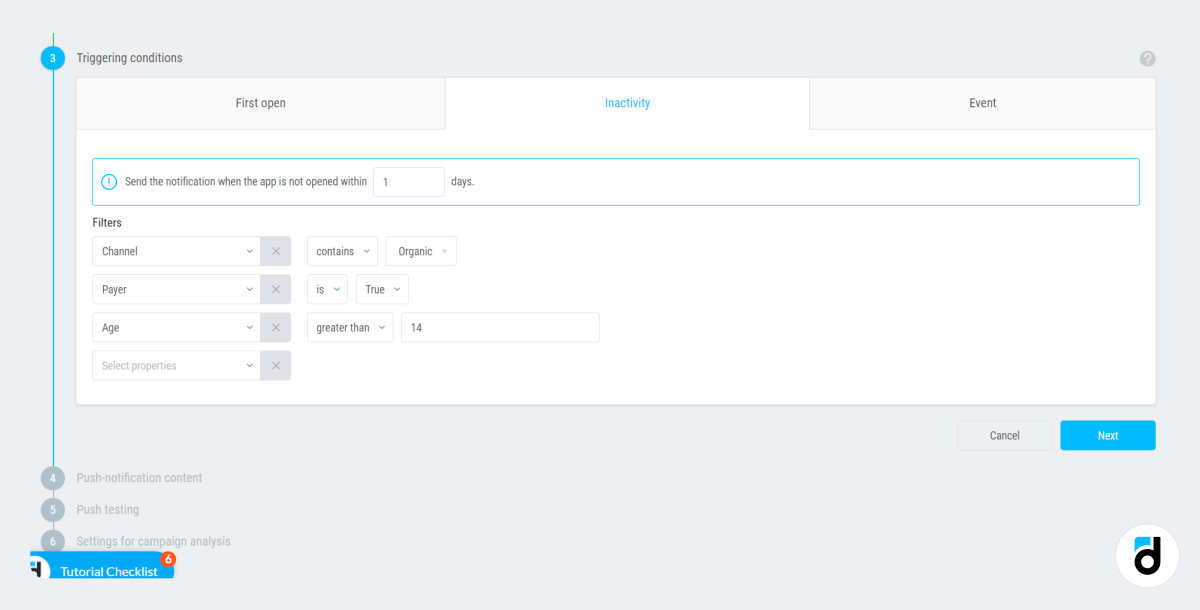
There are actually many more conditions that you can set.
-
Event
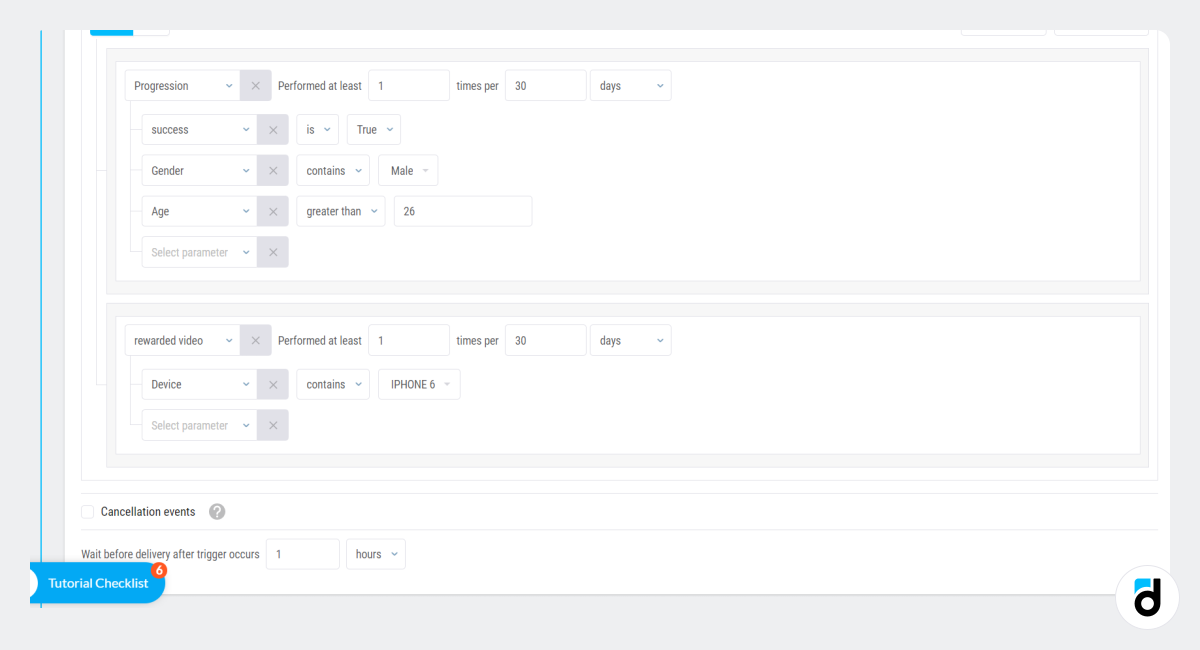
Sending push notifications after a specific event is performed is probably the most useful part of the push notification functionality. Here you have a choice of seven basic and any number of custom events with selected parameters, which you can group at your discretion using the operators “and” and “or”.
For example, you want to send a notification to male iPhone 6 users over the age of 26, who, at the same time, watched a promotional video:
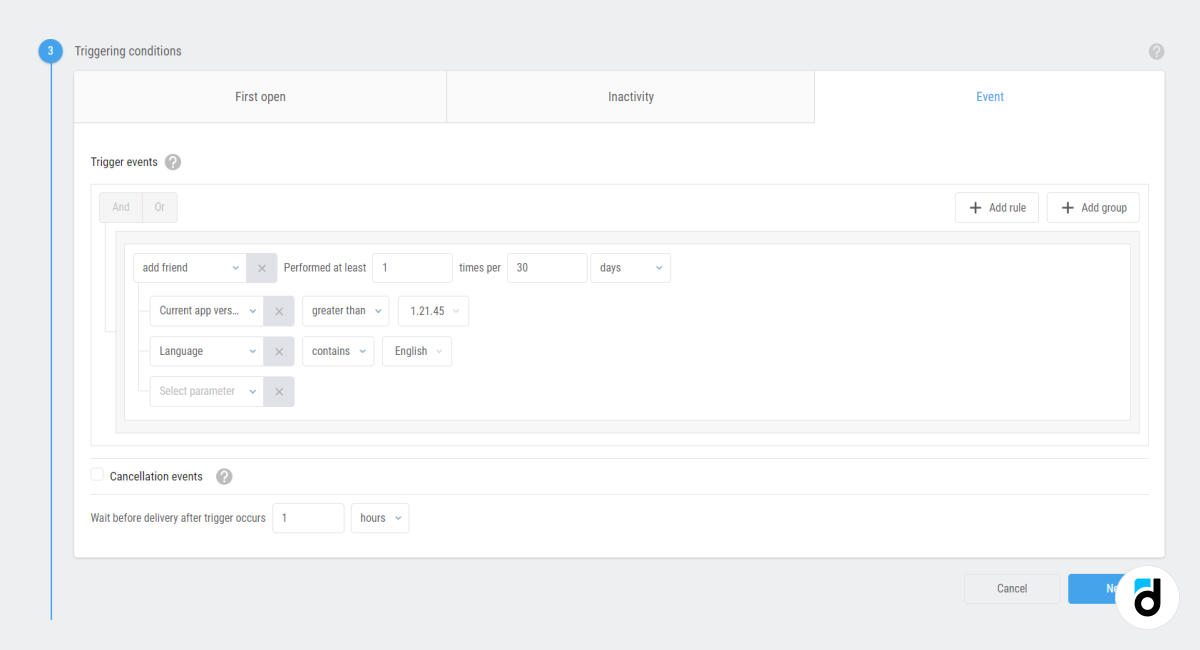
Or send a notification to English speakers, who use the app version > 1.21.45 and have performed an 'add friend' event, inviting their buddies to play.
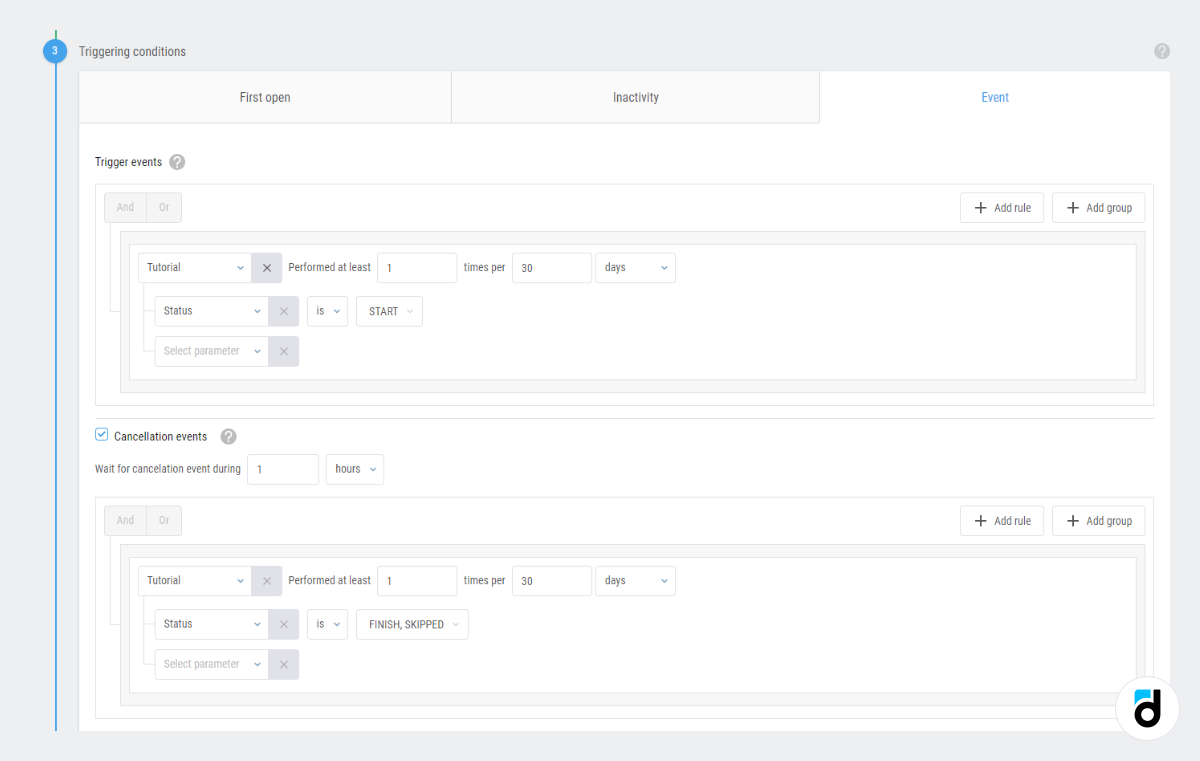
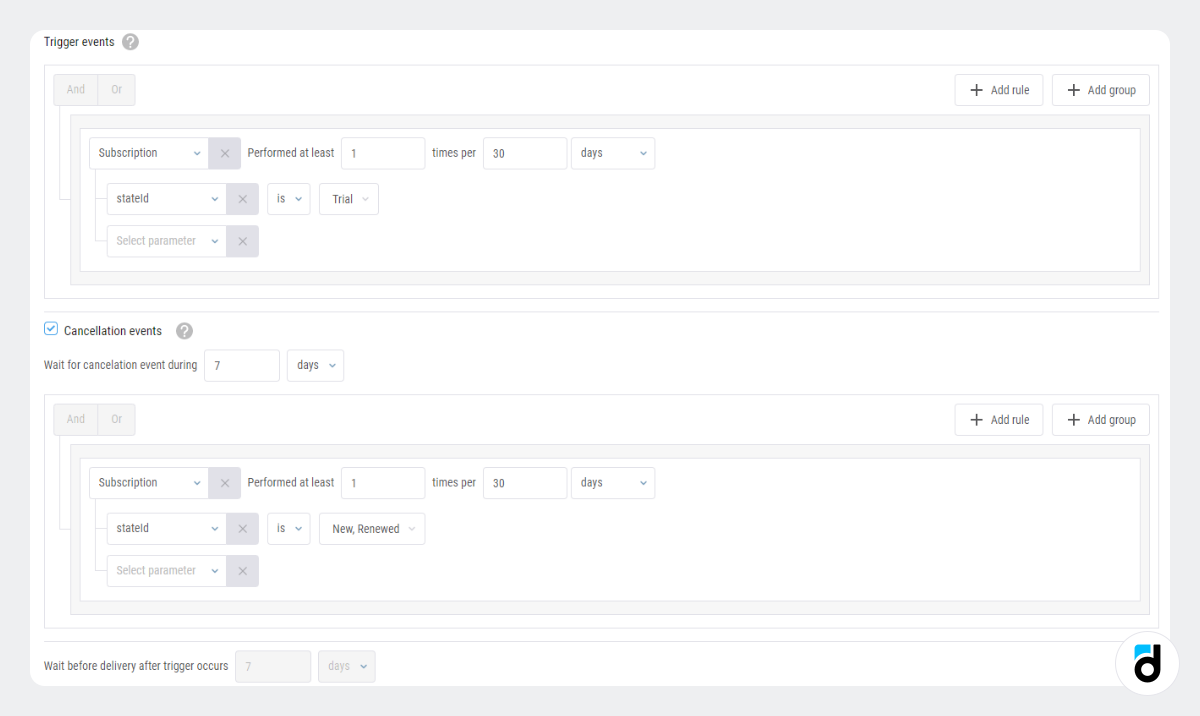
You can also set a cancellation event. That is a certain event that cancels the notification dispatch.
For example, you want to send a notification to all Australian users who moved to the next level but didn't complete the tutorial.
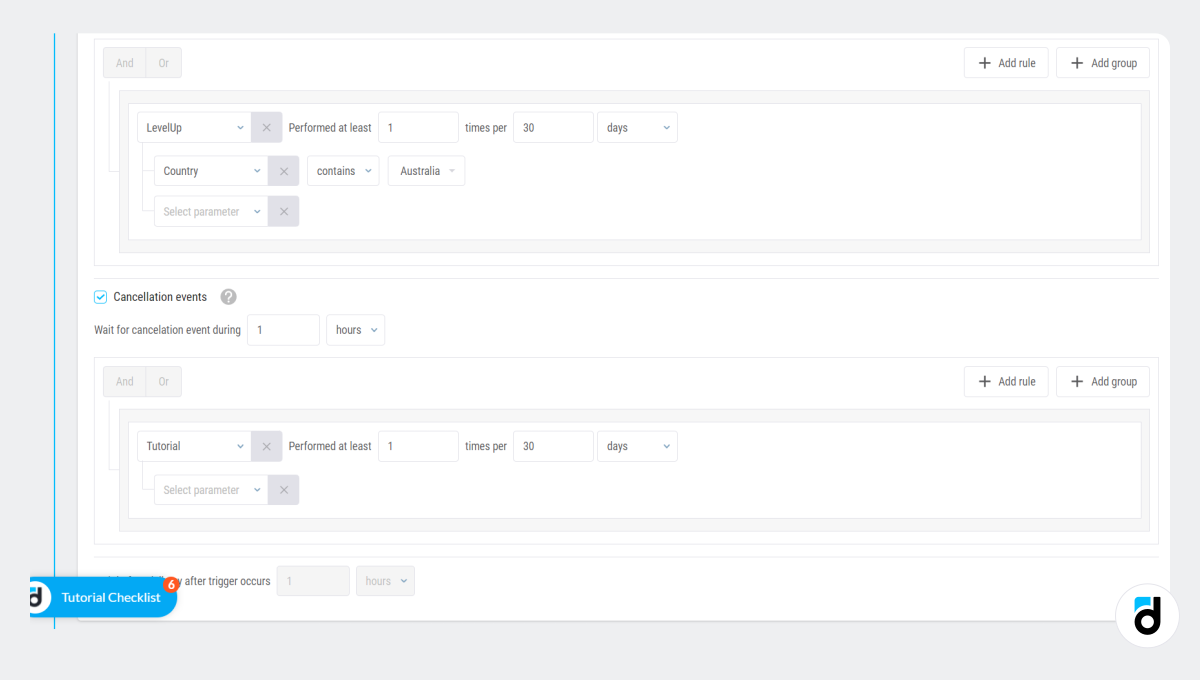
We can set a cancellation event if we send a notification to users who started onboarding, but have not finished (or have not filled some important data in case we are talking about a non-gaming application).

And one more example. We send a push notification to the users who have installed the trial version of the application but have not updated it to the full version. The cancellation event in this case will be a subscription purchase.
Recurring push notifications
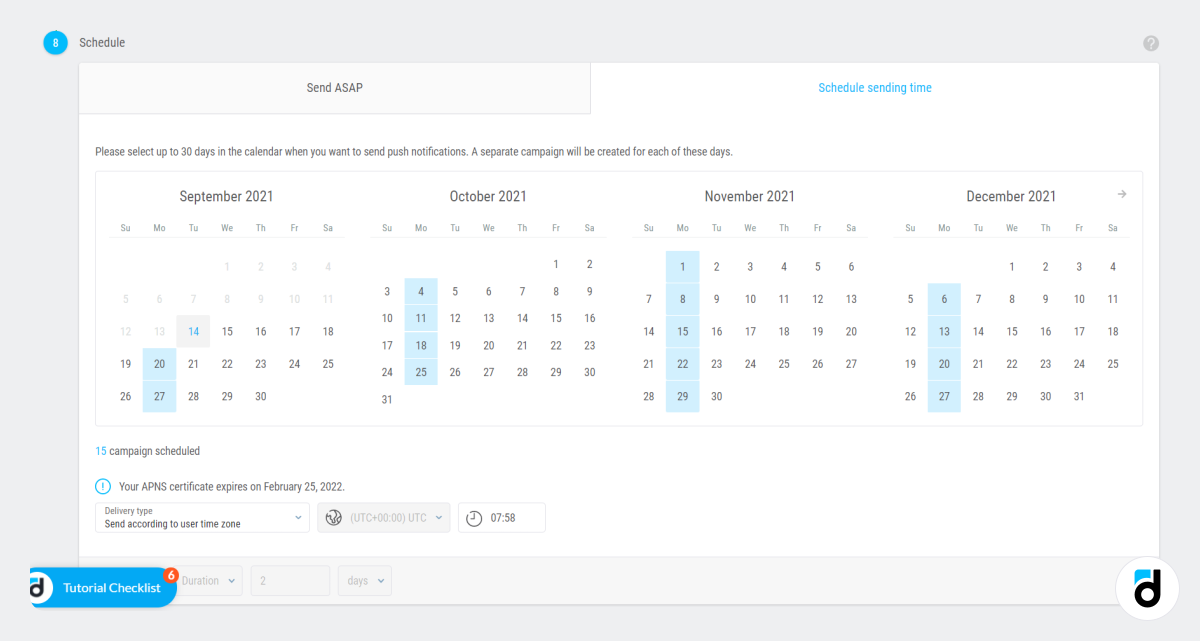
You can send push notifications according to a specific schedule that you have set. For example, if you manage a game, you need to remind users daily that they can receive a daily bonus, a free spin of the wheel of fortune, or have access to a new level. In non-gaming applications, you can every day remind your users that a news report is ready, or that it's time to train or meditate, or that it's time to sleep, etc. You don’t need to open the configurations and manually send the message every day. You don't even need to copy the previous campaign. You just need to schedule messages in the calendar.
Let's see how to send recurring push notifications using the devtodev interface.
At the last step, after you have already fully configured the notification, selected texts, and creatives, you can set a schedule. For example, all Mondays:
Push Notification Analytics
At the devtodev analytics platform, you can not only create push notifications but also analyze them.
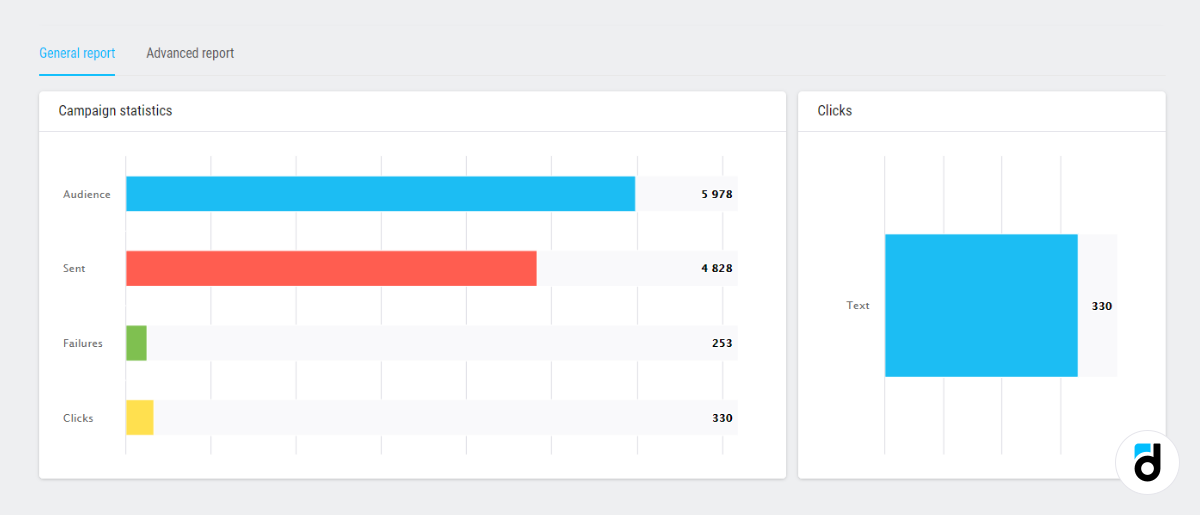
Open the push notifications tab and click the notification. Here you can immediately see the general statistics - the notification’s target audience, the number of notifications sent, the number of failures, and the number of clicks:
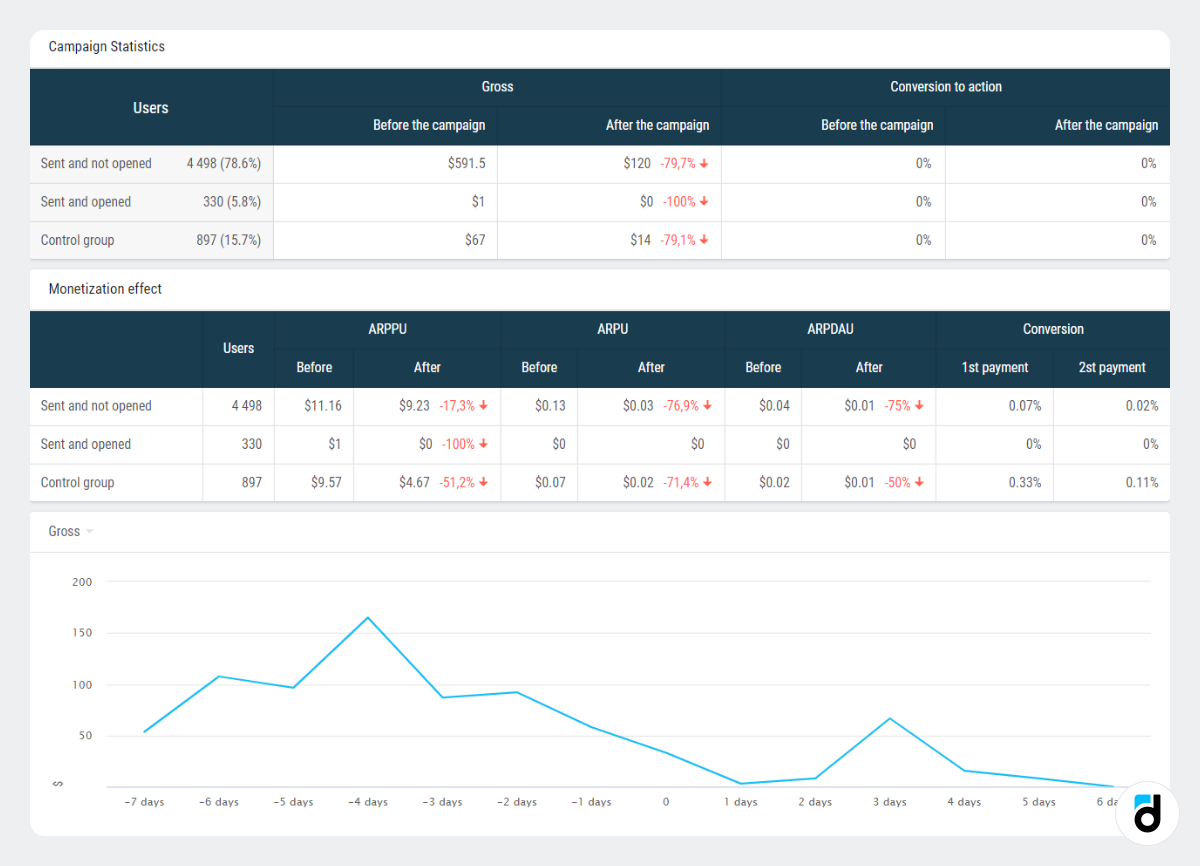
If you open the ‘Advanced report’, you can estimate how profitable a push campaign was. See how your Gross, ARPPU, ARPU, ARPDAU has changed and how many users reach the conversion goal:
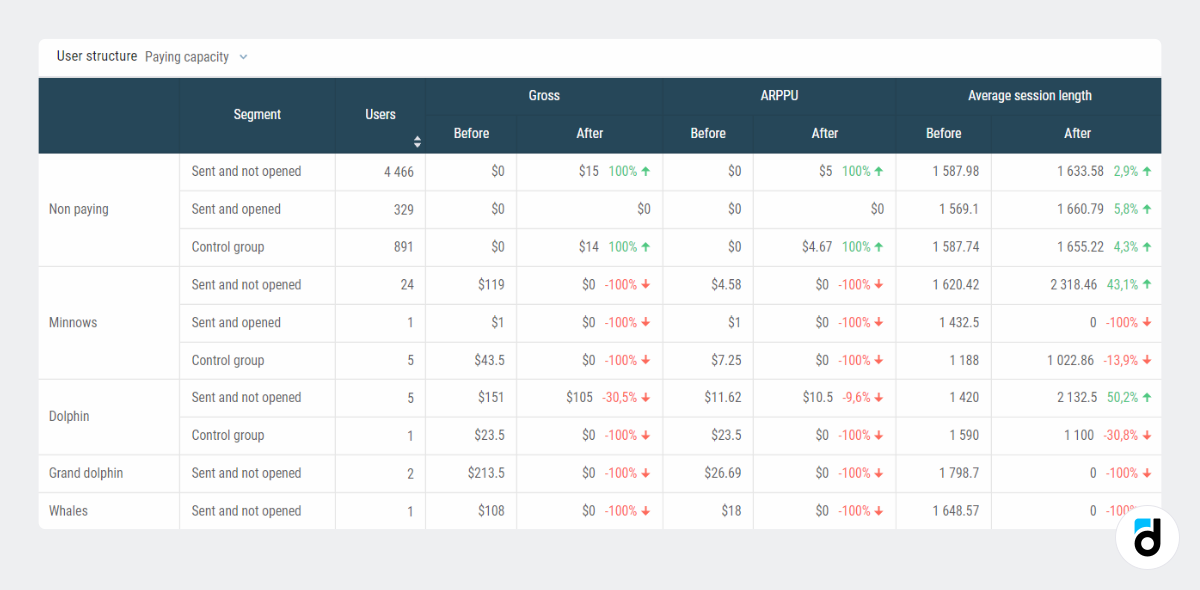
Then there is the same data broken down by countries, days after install, segments (free users, minnows, dolphins, etc.):
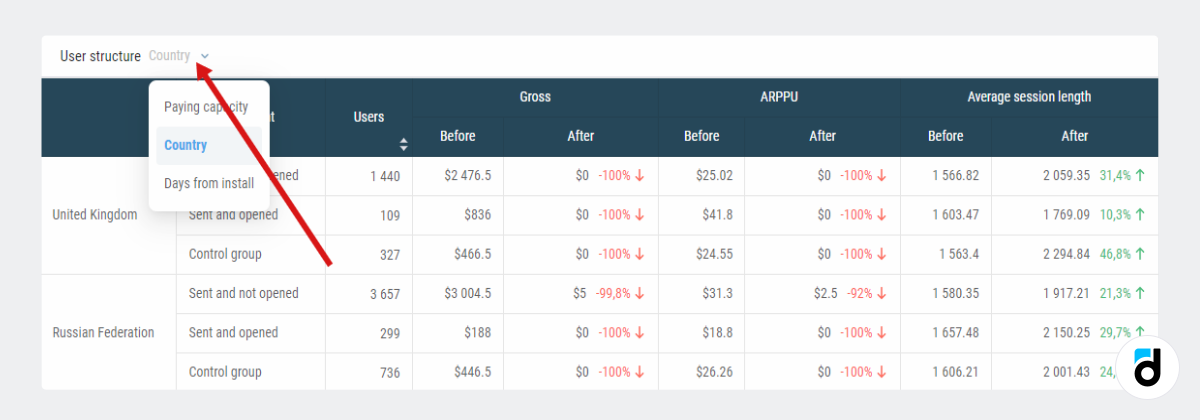
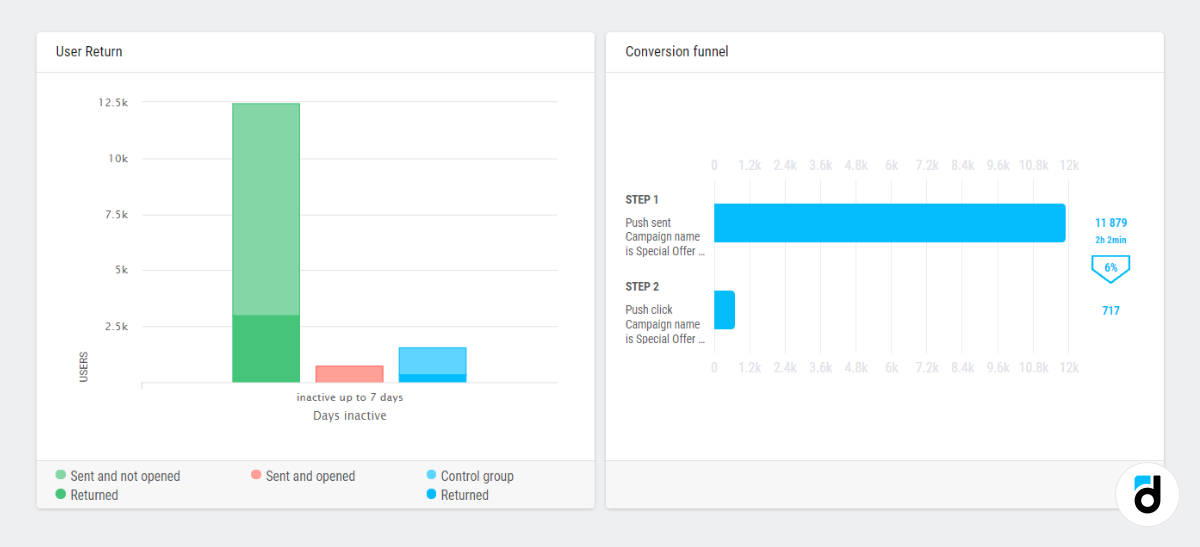
At the end, you can see how many users you managed to re-engage with your project, provided that the message was open/not open, as well as control group information for comparison. In addition, there is a visual conversion funnel:
N.B. Trigger campaign analytics is a bit different, but it's not available in the demo project.
How to create a push notification campaign
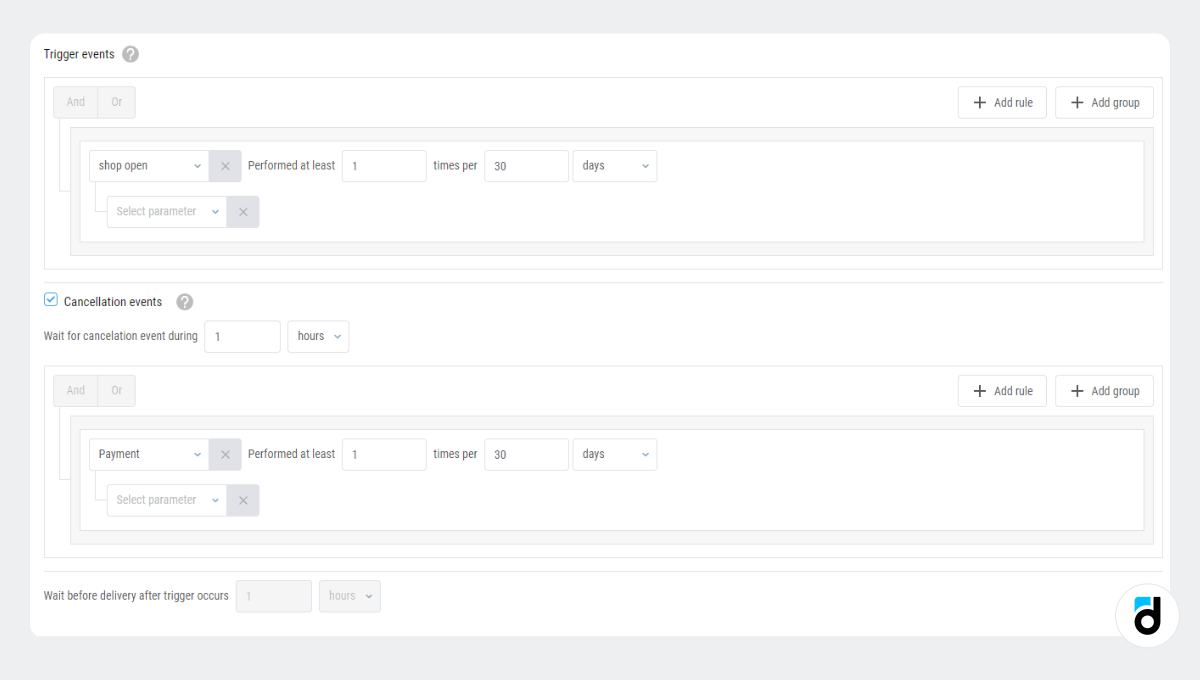
Let's create a push notification campaign. Imagine that we have a ‘LORD Silver’ game and we want to send push messages when users open the game store but don’t make a purchase.
First, fill in the campaign name field. Then choose the type - ‘Automated campaign’.

Then set the trigger conditions:
1. Shop open
2. Cancellation event - at least one payment.
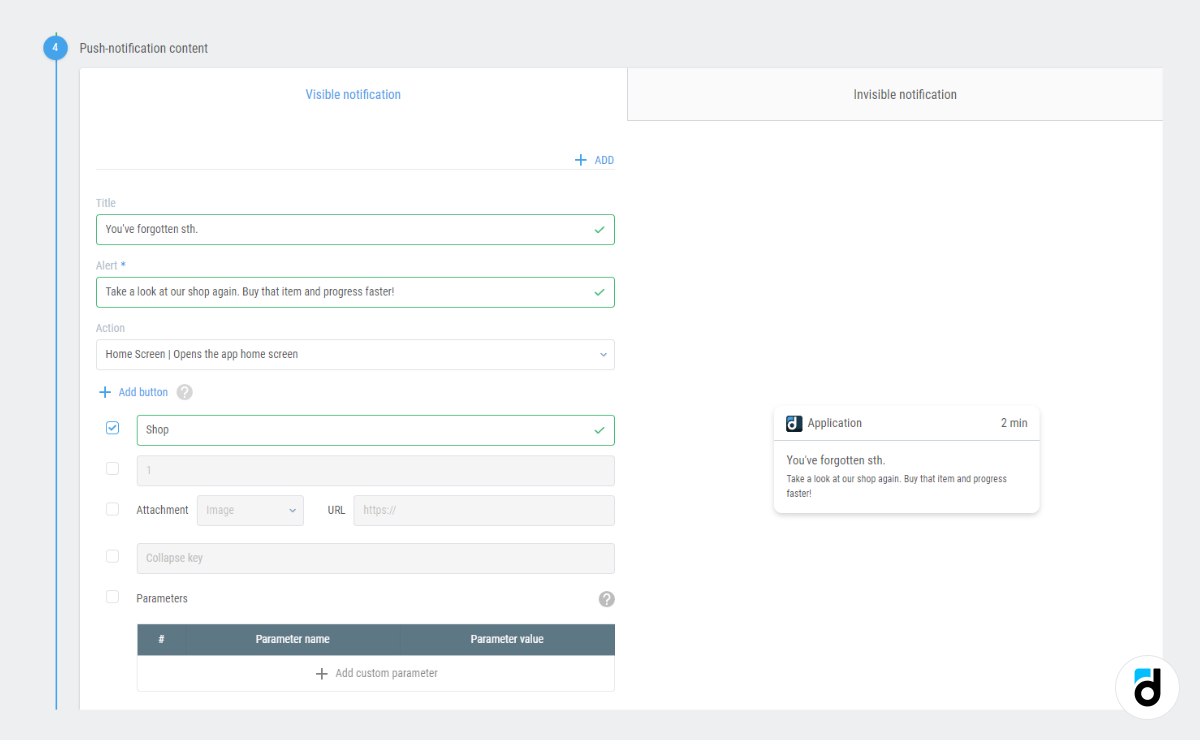
Next comes the most creative part - the text of the message and graphics. Here you can also see how the message will look and choose where it will appear.
Test it.

Set up a control group if you want to compare the behavior of these people with another cohort.

Set up the push gateway - production or sandbox.

Select the start and end date from the calendar. It determines the period when the message will be sent to all users who meet the conditions. Here you can also limit the number of messages.
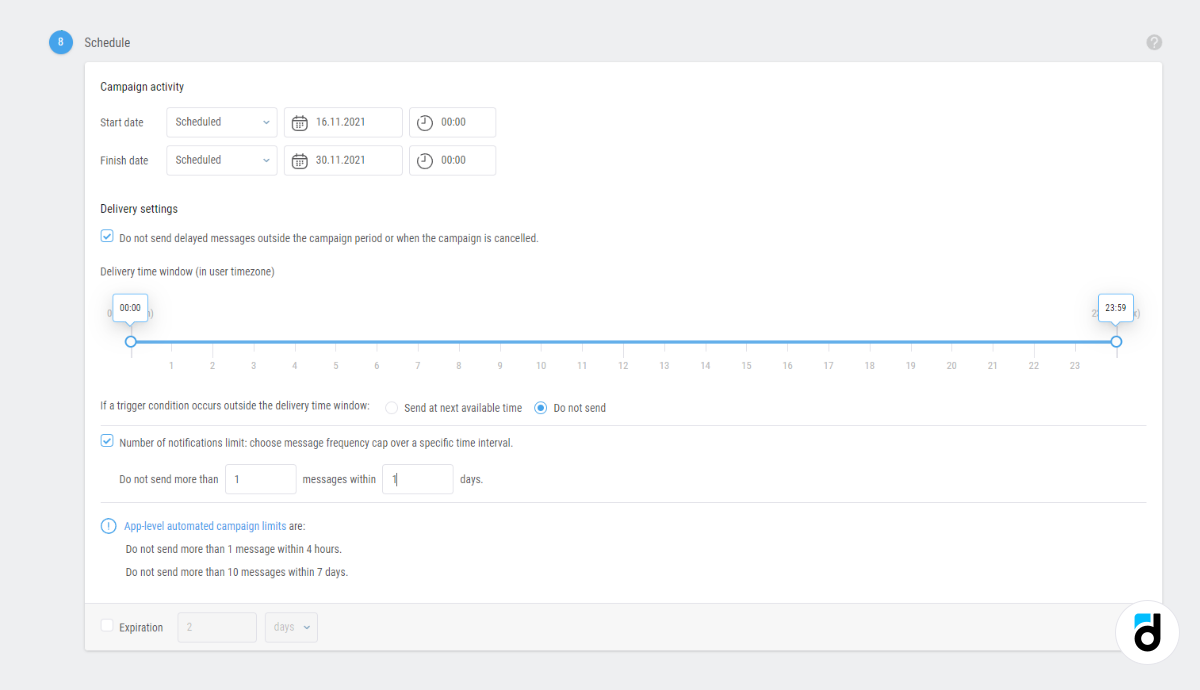
That's it! Your push notification has been created and is ready for sending!
Watch the entire process:
Push notifications are great!
Push notifications are a very effective and at the same time flexible communication channel, which you can easily configure. Another great benefit is that after analyzing the results of your push notification campaigns, you will develop a better understanding of your audience, of its needs and "pain points”, and you will be able to activate users, re-engage them with the application, or encourage them to pay more.
Read more in our documentation.
